Crafting The Cosmos: Making Your Own Phases Of The Moon Craft
Detail Author:
- Name : Jermain Jakubowski
- Username : norwood08
- Email : nwolf@rempel.net
- Birthdate : 1992-07-01
- Address : 132 Gibson Wells Adanborough, UT 12593
- Phone : 1-220-771-0627
- Company : Kunde LLC
- Job : Molding and Casting Worker
- Bio : Nihil molestiae alias velit sint et nemo. Fuga placeat dicta distinctio veniam. Non nisi assumenda voluptates consequatur. Fugiat voluptatum officiis aut inventore.
Socials
instagram:
- url : https://instagram.com/reingerh
- username : reingerh
- bio : Velit id quibusdam aliquid quo. Consequatur voluptatum corporis distinctio modi nostrum adipisci.
- followers : 6580
- following : 1851
twitter:
- url : https://twitter.com/hipolito_reinger
- username : hipolito_reinger
- bio : Modi sint eum deleniti sint natus. Et ut tempora dolores sint esse qui in. Eum consequuntur quaerat dignissimos explicabo consectetur aut illum molestiae.
- followers : 3657
- following : 1596
linkedin:
- url : https://linkedin.com/in/hreinger
- username : hreinger
- bio : Et iusto aut impedit odio et.
- followers : 452
- following : 1911
facebook:
- url : https://facebook.com/reinger1986
- username : reinger1986
- bio : Voluptate inventore quo nisi assumenda quam quos consectetur rem.
- followers : 5655
- following : 2453
Have you ever gazed up at the night sky, watching the moon change its shape from a sliver to a full, bright orb? It's a truly amazing sight, isn't it? The moon, you know, doesn't actually change its shape; it's just how much of its sunlit surface we can see from our planet. Understanding these different appearances, or phases, can be a really fun thing to learn about, especially when you get to make something with your hands. So, too it's almost, creating a phases of the moon craft is a fantastic way to bring a little bit of that cosmic wonder right into your home, making learning a very, very hands-on experience for everyone.
This kind of project, a phases of the moon craft, is more than just a simple activity; it's a doorway to exploring how our solar system works. You get to see, in a very tangible way, how the moon moves and how its appearance shifts over time. It’s a bit like building a small model of the universe, and that, is that, truly exciting for curious minds. Plus, it's a chance to spend some quality time together, making something unique and quite beautiful.
Whether you're a parent looking for a cool educational activity, a teacher wanting to brighten up a science lesson, or just someone who loves a good creative challenge, a phases of the moon craft is, you know, a perfect fit. It helps you visualize complex ideas in a simple, really engaging way. It’s also a wonderful way to decorate a room, adding a personal touch that speaks to your interest in the stars above. So, let's get ready to make something truly out of this world, shall we?
Table of Contents
- Why Make a Moon Phases Craft?
- Gathering Your Supplies: What You'll Need
- Making Your Phases of the Moon Craft: A Step-by-Step Guide
- Beyond the Basics: Creative Twists for Your Craft
- Turning Your Craft into a Teaching Moment
- Frequently Asked Questions About Moon Crafts
- Your Next Cosmic Creation
Why Make a Moon Phases Craft?
Making a phases of the moon craft is, in some respects, a fantastic way to connect with science in a very approachable way. It helps you see and understand something that often seems quite abstract. When you physically create each phase, you start to grasp why the moon looks different throughout the month. It’s a lot more impactful than just reading about it in a book, that's for sure.
This kind of project also encourages creativity and fine motor skills. You get to choose your materials, decide on colors, and carefully put everything together. For younger learners, it's a great exercise in cutting, gluing, and painting, which are all, you know, pretty important skills to develop. It’s a very satisfying feeling to see your project come together, piece by piece, into something complete and informative.
Plus, a handmade phases of the moon craft makes for a really cool display. You can hang it in a classroom, a child's bedroom, or even a living space. It serves as a constant reminder of the beauty of our night sky and the wonders of astronomy. It's also, you know, a conversation starter, allowing you to share what you've learned with others. It’s a pretty neat way to show off your scientific and artistic side, actually.
Gathering Your Supplies: What You'll Need
Before you get started on your phases of the moon craft, it's a good idea to gather all your materials. Having everything ready makes the process much smoother and more enjoyable. You don't want to be stopping halfway through to search for something, right? So, here’s a basic list of what you'll probably need for a simple, yet effective, moon phases display.
You'll definitely want some sturdy paper or cardstock. Black or dark blue works really well for the background, as it mimics the night sky. For the moon itself, white or light-colored paper is, you know, pretty essential. A compass or something round like a plate or a large cup can help you draw perfect circles. Scissors are, of course, needed for cutting out your moon shapes.
For coloring and detailing, you'll want white paint or a white marker. A bit of black paint or a black marker will also be very useful for creating the shadowed parts of the moon. Glue is, naturally, a must-have for attaching your moon phases to the background. You might also consider adding some glitter or glow-in-the-dark paint for an extra touch of magic. These little additions can make your phases of the moon craft truly special, apparently.
Making Your Phases of the Moon Craft: A Step-by-Step Guide
Now that you have all your supplies, it's time to get creative and start building your phases of the moon craft. This process is, you know, pretty straightforward, but taking your time with each step will help ensure your final product looks great and is accurate. Remember, it's all about having fun while you learn!
Preparing Your Base
First, take your dark-colored paper or cardstock. This will be the background for your moon phases. If you want, you can make it a bit bigger than you think you’ll need, and then trim it down later. This gives you some flexibility, you know. You might also want to lightly sketch out where each moon phase will go. This helps with spacing and makes sure everything looks balanced in the end. A pencil can be used for these light markings, which can be erased later, if needed. It’s a good starting point, basically.
You could also consider adding a title to your background at this stage, something like "Phases of the Moon." This makes your craft more informative right from the start. Just make sure the title isn't too big, so it doesn't take away from the moon phases themselves. It's a subtle detail that adds a lot, you know, to the overall presentation. A nice, clear title helps people immediately understand what they are looking at, which is, actually, pretty helpful.
Shaping the Moon Phases
Next, grab your white paper or cardstock. You'll need to draw eight circles of the same size. These circles will represent the eight main phases of the moon. Using a compass or tracing around a round object, like a jar lid or a small plate, will help you make them perfectly round. Accuracy here is, you know, pretty important for a good-looking phases of the moon craft. Take your time drawing each circle carefully.
Once your circles are drawn, carefully cut them out. Try to cut along the lines as neatly as possible. These circles are the foundation of your moon phases. After cutting, you’ll have eight blank white moons. This is where the magic really starts to happen, you know, as you begin to transform these simple circles into the different lunar appearances. It's a very satisfying part of the process, actually, seeing them all lined up.
Adding the Details
Now, it's time to give each of your white circles its unique moon phase look. This involves using your black paint or marker to create the shadowed parts. For the "new moon," you'll color the entire circle black, as it's completely dark from our perspective. For the "full moon," you leave the entire circle white, because we see all of its sunlit side. It's pretty straightforward, you know.
For the other phases, you'll need to be a bit more precise. For the "crescent" phases, you'll paint most of the circle black, leaving just a thin sliver of white. For the "gibbous" phases, you'll paint just a small crescent of black, leaving most of the circle white. The "first quarter" and "last quarter" moons will be half white and half black, with a straight line down the middle. It’s a bit like an art project mixed with science, actually, which is, you know, pretty cool.
Remember to let the paint or marker dry completely before moving on. Smudging can really mess up your phases of the moon craft. You might even want to do two thin coats of paint if you're using it, just to get a nice, solid color. This attention to detail will make your finished product look much more polished and professional. It’s worth the extra few minutes, honestly.
Putting It All Together
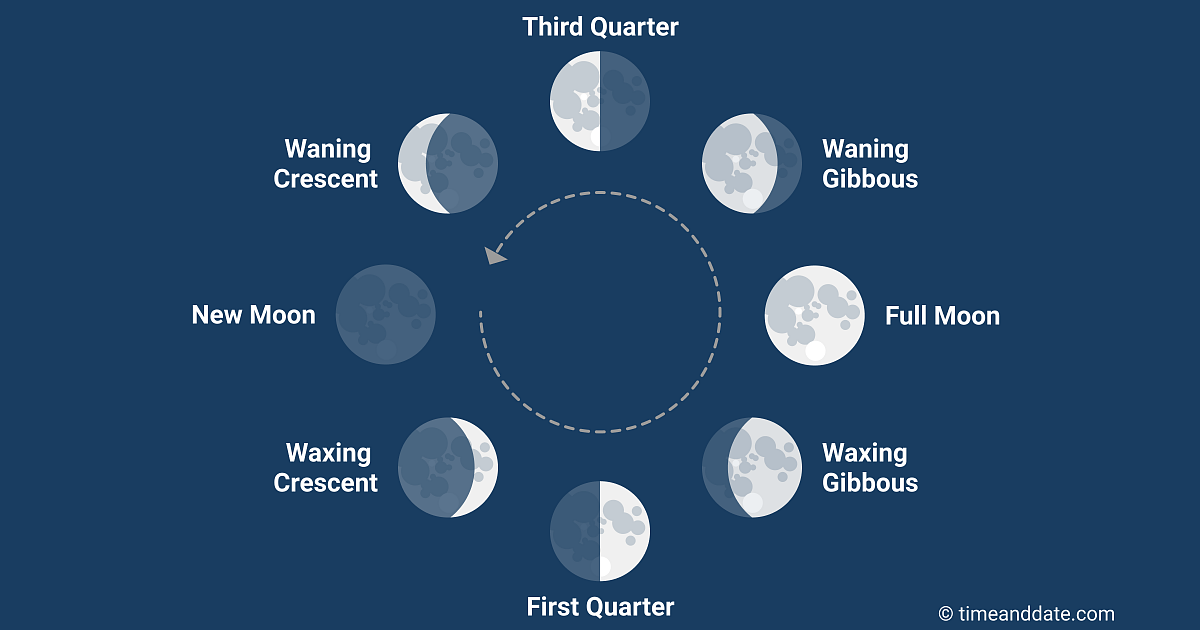
Once all your moon phases are dry and ready, it’s time to arrange them on your dark background. You'll want to place them in the correct order: New Moon, Waxing Crescent, First Quarter, Waxing Gibbous, Full Moon, Waning Gibbous, Last Quarter, and Waning Crescent. This order is, you know, pretty important for accurately showing the lunar cycle. You can draw light pencil lines to help guide your placement.
After you’ve got them arranged just right, use your glue to attach each moon phase firmly to the background. Don't use too much glue, or it might wrinkle the paper. A small amount around the edges or a few dots in the middle should be enough. Press each moon down gently for a few seconds to make sure it sticks well. This is where your phases of the moon craft really starts to take its final shape, and it's a pretty exciting moment, actually.
Finally, you can add labels for each phase. You can write them directly on the background paper or print them out and glue them next to each moon. This makes your craft even more educational and easy to understand. You might also want to add some stars with a white marker or a bit of glitter to the background to make it look even more like the night sky. It's these little touches that, you know, really make your project shine.
Beyond the Basics: Creative Twists for Your Craft
While the basic phases of the moon craft is fantastic, there are so many ways to make it even more unique and personal. You don't have to stick to just paper and paint. Think about different materials you could use to bring your lunar cycle to life. This is where your imagination can, you know, really run wild and create something truly special. It's all about making it your own, after all.
For instance, instead of flat paper moons, you could use Styrofoam balls cut in half. Then, you can paint them to show the different phases, giving your craft a cool 3D effect. Or, perhaps, you could use different textures, like felt or fabric, for each moon phase. This adds a tactile element that's, you know, pretty engaging, especially for younger kids. It makes the craft more interesting to touch and explore.
You could also add lights! Small LED fairy lights could be placed behind each moon phase, making them glow. This would create a stunning night-light effect and really bring the cosmos into your room. Imagine a phases of the moon craft that actually lights up; it's, you know, pretty awesome. You could even use glow-in-the-dark paint so your moons shine when the lights go out, which is, honestly, a very cool touch.
Consider making your craft interactive. You could create a spinning wheel where you match the moon phase name to its visual representation. Or, you could add small facts about each phase next to it, making it a mini-poster of lunar knowledge. The possibilities are, you know, pretty endless when you start thinking outside the box. It’s about making the learning experience as fun and memorable as possible, really.
Turning Your Craft into a Teaching Moment
Creating a phases of the moon craft is, you know, already an educational activity, but you can take it even further to really deepen the learning. As you work on the project, talk about what each phase means. Explain why we see different amounts of light on the moon. This conversation makes the craft much more meaningful than just a simple art project. It's a chance to share knowledge, you know.
You can use your finished craft as a visual aid. Point to each phase and discuss its name and characteristics. For example, explain that the "waxing" phases mean the lit part is growing, and "waning" means it's shrinking. You could even track the real moon in the sky each night and compare it to your craft. This helps connect the abstract model to the real world, which is, you know, pretty important for understanding.
Ask questions! "Which phase comes after the New Moon?" or "What does a Waning Gibbous moon look like?" These questions encourage active thinking and help reinforce what's been learned. You could even create a small quiz using your craft as the answer key. It's a way to make learning fun and, you know, a bit like a game. The more interactive it is, the better, honestly.
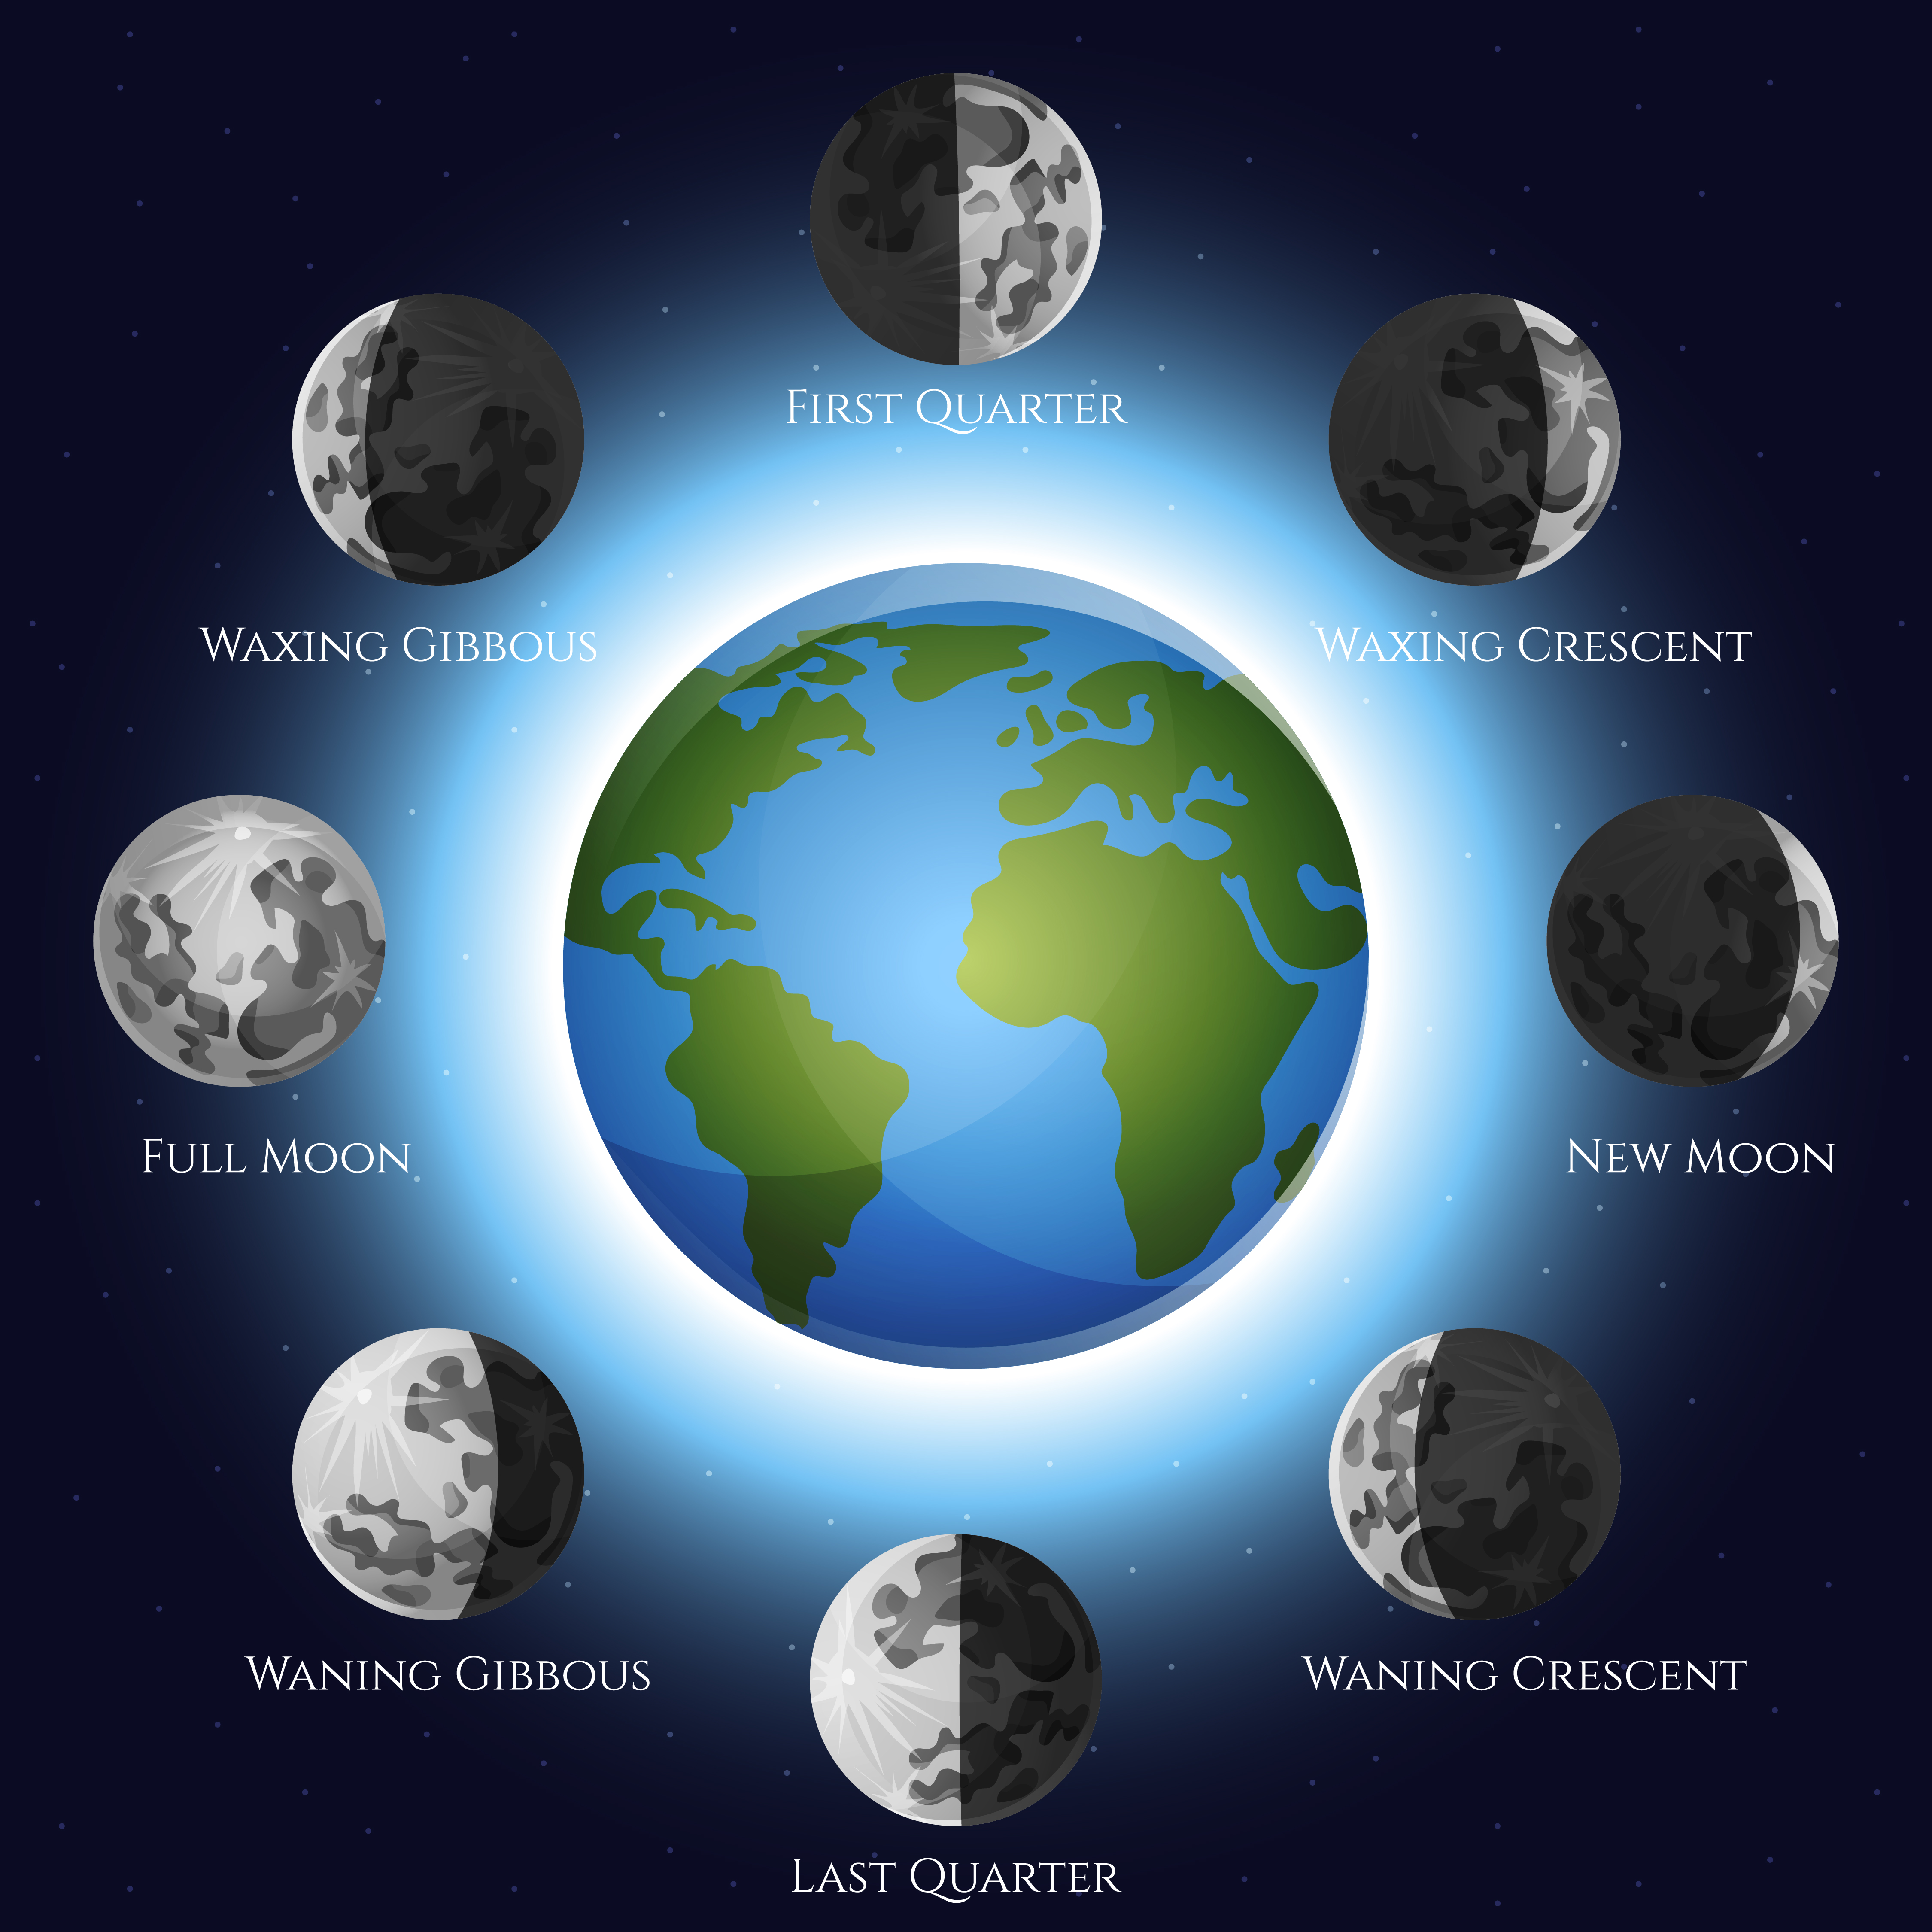
You might also want to talk about why the moon has phases. Explain that it's because the moon orbits Earth, and as it moves, the sun lights up different parts of its surface from our view. This helps kids understand the bigger picture of our solar system. It’s a pretty complex idea, but the craft helps make it simpler to grasp. You know, it’s a tangible representation of a cosmic dance, which is, actually, pretty amazing.
Frequently Asked Questions About Moon Crafts
People often have questions about the moon and how to best represent its phases in a craft. Here are some common inquiries that might help you as you create your own phases of the moon craft.
What are the 8 phases of the moon called?
The eight main phases of the moon are: New Moon, Waxing Crescent, First Quarter, Waxing Gibbous, Full Moon, Waning Gibbous, Last Quarter, and Waning Crescent. These names describe how much of the moon's surface is lit by the sun and whether that lit part is growing or shrinking. It's a very specific sequence, you know, that repeats itself over and over again.
What materials can I use to make a moon phase model?
You can use many different materials to make a moon phase model. Common choices include paper or cardstock, Styrofoam balls, clay, or even cookies! The key is to be able to show the lit and dark parts accurately for each phase. You know, it really depends on what you have on hand and what kind of look you're going for. Get creative with it, honestly.
How do you explain the phases of the moon to a child?
To explain the phases of the moon to a child, you can use simple analogies. Imagine the moon is a ball, and the sun is a flashlight. As you move the ball around your head, the flashlight lights up different parts of it, just like the sun lights up different parts of the moon as it orbits Earth. Your phases of the moon craft will be a really good visual aid for this explanation, too. It makes the concept much easier to visualize, you know.
Your Next Cosmic Creation
Making a phases of the moon craft is a truly rewarding experience. It combines art, science, and a bit of wonder, all in one fun project. You get to learn about our nearest celestial neighbor in a way that’s both hands-on and visually engaging. It’s a pretty satisfying feeling to create something that not only looks good but also teaches you something significant about the universe around us. So, if you're looking for a project that's both educational and enjoyable, this is, you know, a perfect choice.
Remember, the best part about this craft is that it’s yours. Feel free to experiment with different colors, textures, and even add your own personal touches. There’s no single right way to make it, only your way. And, you know, once you've made your phases of the moon craft, you'll have a beautiful reminder of the moon's incredible journey through the sky. It's a pretty cool piece of art that tells a scientific story, actually.
So, go ahead and gather your supplies, find a comfy spot, and let your creativity shine. You're about to make something truly special that connects you a little more closely to the vastness of space. It's a wonderful way to spend an afternoon, and you'll have a fantastic piece of cosmic art to show for it. Learn more about astronomy projects on our site, and you might even want to link to this page for more information about the moon's phases from a very credible source. Happy crafting!
Waning Gibbous Moon
Moon Phases Illustration 463034 Vector Art at Vecteezy
Phase | Definition, Examples, & Facts | Britannica
