Mastering Pike Drawing: Capturing The Water Wolf's Fierce Beauty
Detail Author:
- Name : Vinnie Klocko
- Username : fay.moises
- Email : qskiles@heller.com
- Birthdate : 2002-01-19
- Address : 7102 Swaniawski Harbors Suite 162 Port Aaron, UT 06541
- Phone : +1-484-572-1890
- Company : Schneider Ltd
- Job : Psychiatric Aide
- Bio : Adipisci accusantium animi ex et. Illum rerum et fugiat. Impedit itaque est maxime dolore adipisci repellendus. Ea quos ex debitis sit et magni quia. Ea sed quia ex dolores.
Socials
tiktok:
- url : https://tiktok.com/@dovie3000
- username : dovie3000
- bio : Sit sapiente labore repellendus occaecati reiciendis odio dolorem.
- followers : 678
- following : 443
instagram:
- url : https://instagram.com/bosco1995
- username : bosco1995
- bio : Asperiores ut id qui est voluptatum corporis ad. Adipisci aliquam quos ut eligendi qui.
- followers : 2312
- following : 258
linkedin:
- url : https://linkedin.com/in/dovie7212
- username : dovie7212
- bio : Ut rerum ut placeat quas nobis aut.
- followers : 2451
- following : 1353
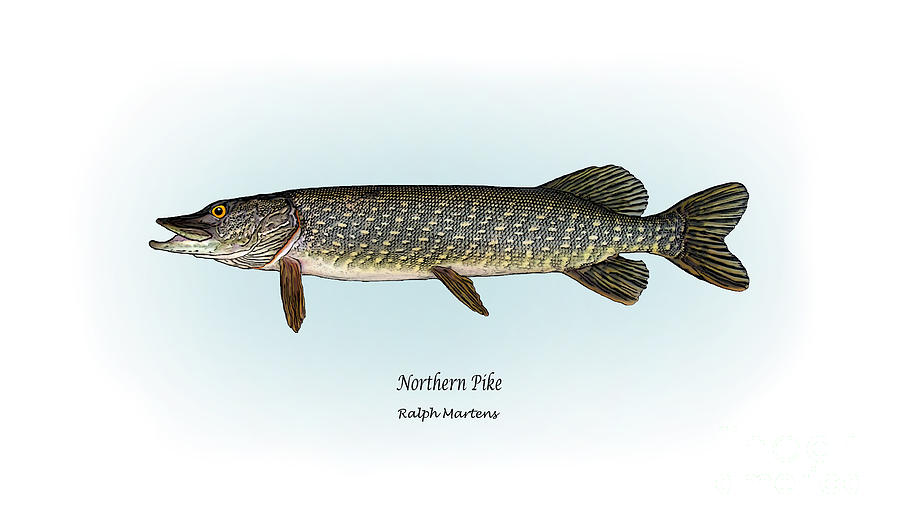
Have you ever looked at a photograph of a northern pike and felt an urge to capture its striking appearance on paper? That's a pretty common feeling, you know. These fish, with their long, sleek bodies and powerful jaws, are quite a sight to behold, especially when you think about their role in the water. Getting a good pike drawing can be a really rewarding artistic challenge, offering a chance to explore detailed textures and shapes.
There's something truly captivating about these freshwater predators. They are known simply as a pike in Great Britain and Ireland, but here, we often call them northern pike. They have this incredibly distinct look, from their flattened snout to their many sharp teeth. It's almost like they're built for speed and hunting, which makes them a fascinating subject for any artist.
This guide will walk you through the key aspects of creating an impressive pike drawing. We'll explore what makes a pike look like a pike, talk about some tools you can use, and even touch on how to bring out that fierce, yet beautiful, quality they possess. So, you know, get ready to put pencil to paper and bring one of these amazing fish to life.
Table of Contents
- Understanding the Pike: Its Unique Features
- Getting Started with Your Pike Drawing
- Step-by-Step Approach to Drawing a Pike
- Tips for a Realistic Pike Drawing
- Common Questions About Drawing Pike
Understanding the Pike: Its Unique Features
Before you even pick up a pencil, it's really helpful to get a good feel for what a pike looks like. They are, after all, quite specific in their appearance. Knowing their key features will make your pike drawing much more accurate and lively. These fish are known as cool water, toothy, torpedo-shaped creatures, which either delight or frustrate anglers, depending on the day, I guess.
The Body Shape and Structure
A pike is a long, slender fish, that's pretty clear. Their body tapers towards the tail, giving them that sleek, almost missile-like shape. This form is built for quick bursts of speed, so when you draw them, you want to convey that sense of power and readiness. They are, you know, built for speed in the water.
Their scales are rather small, which can be a bit tricky to draw individually. Instead of drawing every single one, it's often better to suggest their presence through texture and subtle shading. This helps to create a more realistic overall look, as a matter of fact.
That Distinctive Head and Mouth
The head of a pike is truly unique. It's long and has a shovellike snout. This flattened snout is one of their most recognizable traits. You really want to make sure you get this shape right in your pike drawing, as it's a huge part of their identity. The large mouth, full of sharp teeth, is also a very important feature.
Those teeth are, you know, a big part of what makes a pike a pike. They are quite formidable, and capturing them accurately can add a lot of intensity to your drawing. Think about how they fit into the mouth and how they might look when the mouth is slightly open or closed. They are, after all, a large carnivorous species.
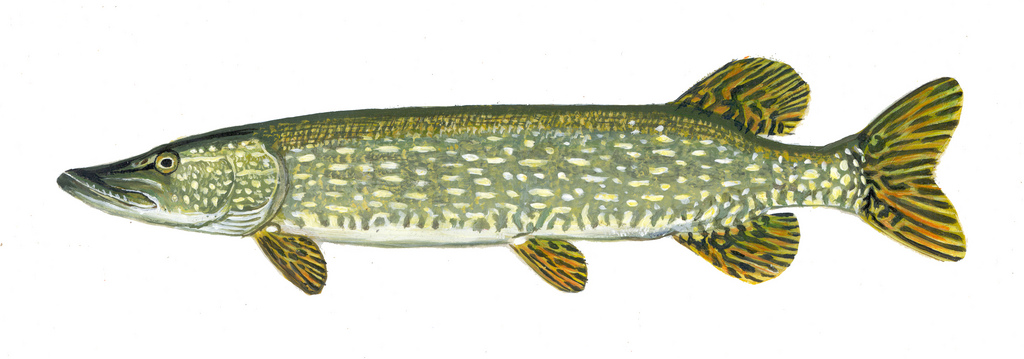
Patterns and Coloration
Pike are olive green in color, typically, with creamy blotches along their sides. These markings can be extraordinarily complex and change based on the fish's age and even its environment. This offers a lot of artistic freedom, actually, when you're doing a pike drawing.
You can experiment with how you render these blotches, making them more defined or softer, depending on the effect you want. The variation in their patterns means no two pike drawings have to be exactly alike, which is pretty cool, I think. It's almost like each fish has its own unique fingerprint.
Getting Started with Your Pike Drawing
So, you're ready to start your pike drawing. That's great! Having the right tools and good reference material can make a huge difference in how your artwork turns out. It's about setting yourself up for success, basically.
Choosing Your Materials
For a realistic pike drawing, you might want to consider a few different pencils. A range of graphite pencils, from hard (like 2H) for light sketches to soft (like 6B or 8B) for dark shading, is pretty useful. This allows you to create a wide range of tones and textures. You could also use charcoal for deeper blacks, or colored pencils if you want to add that olive green and creamy blotch effect.
Good quality drawing paper is also important. Something with a bit of tooth or texture can help hold the graphite and allow for better layering. A kneaded eraser is really handy for lifting out highlights and making subtle corrections without damaging the paper. And, of course, a sharpener is a must-have, as a matter of fact.
Finding Good References
The best way to get a realistic pike drawing is to use good reference photos. Look for pictures that show the pike from different angles, and pay attention to details like how light hits its scales or the exact shape of its fins. You can find many images online, perhaps even from fishing forums or wildlife photography sites. You know, places where people share their catches.
If you're interested in where these fish live, you could check out places like the New Hampshire Fish and Game website. They often have information on suggested fishing locations for northern pike, which might give you a better feel for their environment. That kind of background knowledge can really help your drawing feel more authentic, too. Here's a link to the NH F&G website for general information.
Step-by-Step Approach to Drawing a Pike
Now, let's get into the actual drawing process. Breaking it down into smaller steps can make the whole thing feel less daunting, you know. It's like building something one piece at a time.
Laying Down the Basic Shape
Start with very light lines to sketch the overall body shape of the pike. Think of it as a long, tapered cylinder. Get the length and the general curve of its back and belly right. This initial sketch is just a guide, so don't press too hard. You want to be able to easily erase and adjust it. It's basically the foundation of your pike drawing.
Pay attention to the proportion of the body compared to the head. The head is quite long in a pike, so make sure it looks balanced with the rest of the fish. This initial step is really about getting the big picture right, before you get into the smaller details. You're just blocking it out, sort of.
Adding the Head and Facial Details
Once the body shape feels good, start refining the head. Sketch in that distinctive shovellike snout and the large mouth. Remember those sharp teeth; you don't have to draw every single one at this stage, but indicate their presence. The eyes are also very important; they are large and set on the sides of the head. So, you know, place them carefully.
The gill covers also have a specific shape. Observe how they curve and meet the body. These details, even if subtle, add a lot to the realism of your pike drawing. It's about capturing all those little things that make a pike look like a pike, as a matter of fact.
Working on Fins and Scales
Pike have several fins: dorsal, caudal (tail), pectoral, pelvic, and anal. Their dorsal and anal fins are set far back on the body, near the tail, which is a key characteristic. Sketch these in, paying attention to their shape and how they attach to the body. The tail fin is quite broad and powerful, too.
For the scales, as mentioned before, you don't need to draw each one. Instead, use light, overlapping strokes or small, circular motions to suggest their texture. You can create areas of slightly darker shading to imply the overlapping nature of the scales. This approach helps maintain the smooth, sleek appearance of the fish, basically.
Bringing in the Markings and Texture
Now comes the fun part: adding the unique markings. Pike have those creamy blotches over an olive green base. Use varying pressure with your pencil to create these lighter areas. You can use an eraser to lift out highlights for the creamy parts. This really brings your pike drawing to life. These markings can be quite complex, as I said, and they vary a lot.
Think about the overall texture of the fish. Is it smooth? Slightly rough? Use light, feathery strokes to build up the surface texture. You can also add very subtle lines to suggest the direction of the scales. This attention to detail really makes the difference, you know, between a good drawing and a great one.
Tips for a Realistic Pike Drawing
Making your pike drawing look truly realistic takes a bit of extra thought and technique. It's about more than just getting the shapes right; it's about making the fish feel alive on the page. You want it to look like it could just swim off, basically.
Capturing Movement and Life
Pike are known for being voracious and quick. To convey this, consider drawing your pike in a dynamic pose. Maybe it's slightly curved, as if it's about to strike, or perhaps its fins are subtly fanned out, suggesting it's moving through the water. A static, straight pose can sometimes look a bit lifeless, you know.
Think about the flow of the water around the fish. Even if you're not drawing the water itself, the way you render the fish's body can suggest its environment. This adds a sense of realism and action to your pike drawing. It's almost like you can feel the water around it.
Shading for Depth and Form
Shading is absolutely key to making your pike drawing look three-dimensional. Use darker tones in areas that would be in shadow, like under the belly or in the creases of the fins. Lighter tones and highlights should be placed where light would hit the fish directly, such as along its back or the top of its head. This helps to create the illusion of depth and roundness. It's about making it pop off the page, so to speak.
Vary your pencil pressure to create smooth transitions between light and dark. Blending tools, like paper stumps or cotton swabs, can help achieve a softer, more seamless look. Remember, the goal is to make the fish appear solid and real, not flat. That's really important for a good pike drawing.
Paying Attention to the Eyes
The eyes are often called the windows to the soul, and in a drawing, they can bring a subject to life. Pike have large eyes, and they often have a reflective quality. Make sure to add a tiny highlight in each eye to simulate the reflection of light. This simple detail can make a huge difference, making your pike drawing feel more alive and engaging. It gives them a bit of sparkle, you know.
The pupil should be dark and distinct, and the surrounding iris can have subtle variations in tone. A well-rendered eye can convey alertness and even a hint of that predatory nature. It's a small detail, but it has a really big impact, as a matter of fact.
Common Questions About Drawing Pike
People often have similar questions when they start a pike drawing. Here are a few common ones, with some thoughts on them:
What are the main features of a pike to draw?
The key things to focus on are the long, slender body, the distinct shovellike snout, the large mouth with sharp teeth, and the dorsal and anal fins placed far back near the tail. Also, those creamy blotches on an olive green body are pretty unique. Getting these right will make your pike drawing instantly recognizable, you know.
How do you make a fish drawing look realistic?
Realism comes from paying close attention to details like shading, texture, and light. Use varying pencil pressure to create depth, suggest scales rather than drawing each one, and add highlights to the eyes and body. Capturing a sense of movement can also make it feel more alive. It's about bringing out the actual feel of the fish, basically.
What materials are best for drawing fish?
Graphite pencils in a range of hardness (2H to 8B) are great for detailed work and shading. Good quality drawing paper with a bit of texture helps with layering. A kneaded eraser is also really useful for corrections and highlights. If you want color, colored pencils work well for those specific pike hues. You know, the green and cream.
Creating a compelling pike drawing is a wonderful way to connect with nature and express your artistic side. Whether you're an experienced artist or just starting out, the unique features of the northern pike offer endless opportunities for creative expression. From their powerful bodies to their complex markings, there's so much to explore. So, you know, grab your tools and let your creativity flow. Learn more about drawing wildlife on our site, and check out this page for more fish art inspiration.
Northern Pike Drawing at GetDrawings | Free download

Northern Pike drawing | Fish drawing tutorials | How to draw Northern
Pike Fish Drawing at GetDrawings | Free download
