Learning To Draw Optimus Prime: Your Easy Guide To An Autobot Masterpiece
Detail Author:
- Name : Mr. Monroe Collins
- Username : akeem.bogisich
- Email : vboehm@gmail.com
- Birthdate : 1971-07-23
- Address : 108 Eloisa Radial North Marco, AZ 98039-5647
- Phone : +1 (864) 770-5582
- Company : Fadel, Weissnat and Orn
- Job : Stevedore
- Bio : Aut molestias temporibus voluptas in amet in maiores. Animi hic non nam aut fuga voluptatem. Sint optio qui voluptatem repellendus officia dolore architecto porro. Consequuntur quod qui laborum sit.
Socials
twitter:
- url : https://twitter.com/chelseadietrich
- username : chelseadietrich
- bio : Necessitatibus distinctio assumenda adipisci impedit explicabo. Dolores amet cupiditate voluptatem aut. Placeat accusamus omnis aut qui quod.
- followers : 1442
- following : 2721
linkedin:
- url : https://linkedin.com/in/dietrich1974
- username : dietrich1974
- bio : Consequatur quis a delectus.
- followers : 2808
- following : 1285
tiktok:
- url : https://tiktok.com/@chelsea.dietrich
- username : chelsea.dietrich
- bio : Labore eos saepe debitis vel laudantium.
- followers : 3081
- following : 431
facebook:
- url : https://facebook.com/dietrichc
- username : dietrichc
- bio : Necessitatibus veniam laudantium non vel assumenda.
- followers : 5514
- following : 553
Have you ever looked at Optimus Prime, leader of the Autobots, and thought, "Wow, I wish I could draw something that cool?" Well, you're certainly not alone in that feeling. For many, the idea of sketching such a detailed robot might seem a bit tricky, or perhaps even a little intimidating. Yet, what if I told you that bringing this iconic hero to life on paper is actually much simpler than you might imagine? It’s true, with a few helpful tips and a bit of practice, you can totally create your very own version of the mighty Optimus Prime.
There's something truly special about Optimus Prime, isn't there? Whether you remember him from the classic cartoon, the exciting movies, or perhaps you've seen some of the awesome new toy releases like the Studio Series 86 figures or the Legacy United deluxe models, his presence is always so strong. He represents courage, strength, and a drive to do what's right, which makes him a really inspiring character for artists of all ages. So, learning to capture his look on paper can be a very rewarding experience, too it's almost a way to connect with that spirit.
This guide is here to walk you through the steps, making the whole process of drawing Optimus Prime very easy and fun. We’ll break down his famous design into simple shapes and manageable parts, so you won't feel overwhelmed. Whether you're just starting your drawing adventures or you've got some experience but want to try something new, this is for you. We'll help you create a fantastic drawing of Optimus Prime, maybe even one that captures that clean, powerful look, perhaps without the wheels on the legs, like some of his more streamlined transformations.
Table of Contents
- Why Draw Optimus Prime?
- Getting Your Drawing Stuff Ready
- Starting with Basic Shapes: The Foundation
- Adding the Famous Details: Step by Step
- Bringing Him to Life with Color
- Tips to Make Your Optimus Prime Drawing Even Better
- Common Questions About Drawing Optimus Prime
- Your Next Drawing Adventure
Why Draw Optimus Prime?
Drawing Optimus Prime is more than just putting lines on paper; it's a way to celebrate a character who means a lot to many people. For decades, he's been a symbol of heroism and leadership. Think about all the different versions of him out there, like the Kotobukiya model kits or the various G1 re-releases, each one has a slightly different feel but still clearly Optimus. Sketching him helps you really notice those design elements that make him so recognizable.
It’s also a fantastic way to practice your drawing skills. Robots, with their geometric shapes and distinct parts, are a great subject for learning about proportion, perspective, and how different components fit together. Plus, honestly, it's just plain fun to draw your favorite characters, isn't it? It can be a very relaxing activity, too, and a great way to express your creativity. You might even find yourself sketching out some of his famous inspirational quotes as you draw.
Getting Your Drawing Stuff Ready
You don't need a whole lot of fancy art supplies to start drawing Optimus Prime. Simple things will do the trick, really. Here’s a quick list of what you might want to gather before you begin:
Paper: Any kind of paper works, from plain printer paper to a sketch pad. Just make sure it’s a surface you feel comfortable drawing on.
Pencils: A regular pencil is fine for sketching. If you have a lighter pencil (like an H or 2H) for initial outlines and a darker one (like a B or 2B) for details, that's great, but not essential. A mechanical pencil can be quite good for crisp lines, as a matter of fact.
Eraser: A good eraser is your best friend when drawing. It helps you fix mistakes and refine your lines. A kneaded eraser is pretty neat for lifting graphite gently, but any clean eraser will do.
Optional Coloring Tools: If you want to add color, grab some colored pencils, markers, or crayons. Optimus Prime is famously red and blue, so those colors will be key.
Reference Images: Having a few pictures of Optimus Prime handy can be super helpful. You can find many images online, perhaps of different toy versions or cartoon stills. This helps you see how his parts connect and what his proportions are like.
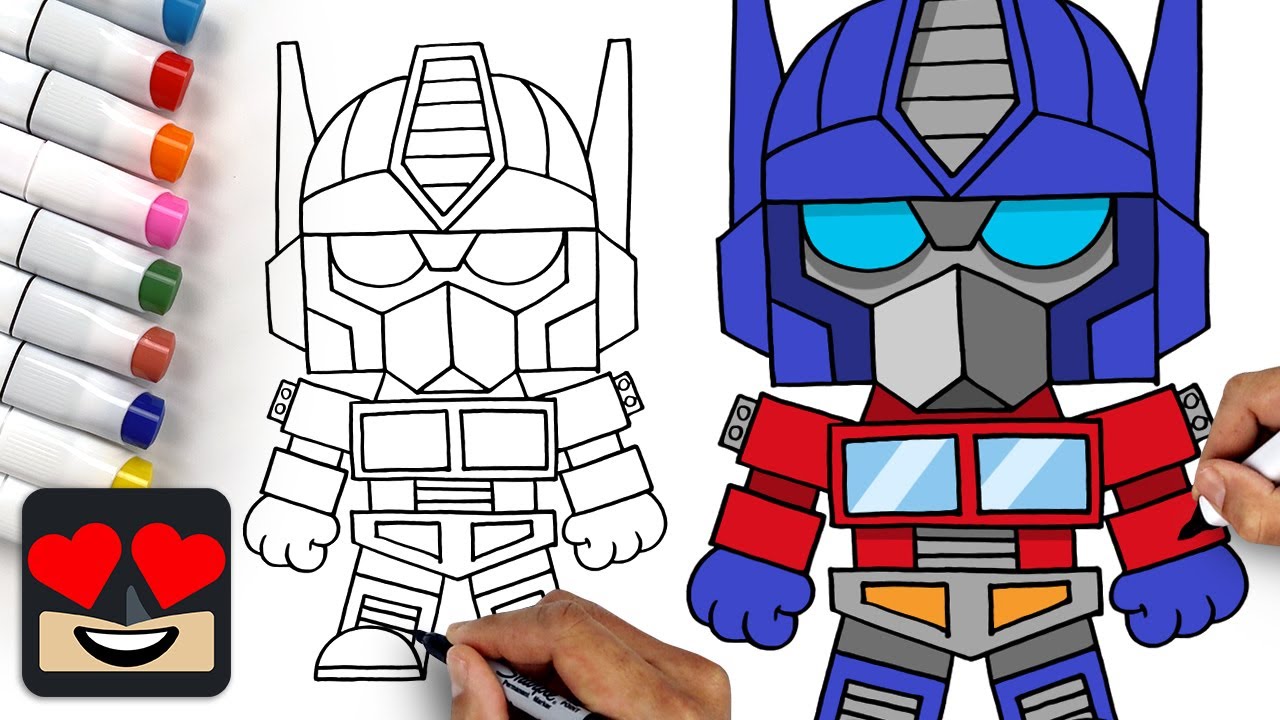
Starting with Basic Shapes: The Foundation
The secret to drawing complex figures like Optimus Prime is to break them down into simple shapes. Think of it like building with blocks, basically. We'll start with the biggest, most basic forms, and then add the smaller details. This approach makes it much less overwhelming, you know?
Step 1: The Torso and Head
Body Block: Begin by drawing a large rectangle for Optimus Prime's chest and midsection. This will be the core of his body. Make it fairly tall and wide, as he is a very imposing figure.
Head Shape: Above the rectangle, draw a smaller, somewhat squarish shape for his head. Don't worry about the helmet details yet; just get the basic outline. You might want to make it slightly wider at the top.
Connecting Neck: Add a short, sturdy cylinder or thick rectangle to connect the head to the body. This helps establish his posture, too.
Step 2: Arms and Legs – Getting the Limbs Right
Shoulder Blocks: On either side of the top of the body rectangle, draw two smaller squares or slightly rounded rectangles for his shoulders. These will be quite prominent.
Upper Arms: From the shoulders, draw two thick, somewhat elongated rectangles for the upper arms. Think of them as strong, sturdy pipes. Make sure they are roughly the same length.
Forearms: Below the upper arms, add two more rectangles for the forearms. These might be a little wider at the bottom, just a little, to hint at his powerful gauntlets.
Hands: For now, simply draw two simple block shapes for his hands at the end of the forearms. We'll add finger details later. They are pretty much like thick mittens at this stage.
Thighs: From the bottom of the main body rectangle, draw two thick, strong rectangles pointing downwards for his thighs. These should be quite substantial, as he has powerful legs.
Lower Legs: Below the thighs, add two more rectangles for the lower legs. These might be a bit more complex, perhaps slightly tapering or widening to suggest his boot-like structure. Some versions, like the G1, have wheels here, but for an easy drawing, you can simplify.
Feet: Finish the legs with two blocky shapes for his feet. They should be wide and stable, giving him a solid stance. Think of them like sturdy boots, kind of.
Adding the Famous Details: Step by Step
Now that you have the basic structure, it’s time to bring Optimus Prime to life by adding his signature details. This is where he really starts to look like himself, you know?
Step 3: Refining the Head and Chest
Helmet: Shape the head block into his iconic helmet. Add the prominent antenna-like structures on the sides and the central crest. His face mask is a flat plate, so draw a simple rectangle for that area. His eyes are usually narrow and blue, so just two small lines will do for now.
Windshield Chest: On his chest, draw two prominent square or rectangular shapes for his truck windshields. These are a very key part of his look. You can add a dividing line between them.
Grille and Bumper: Below the windshields, add the truck grille details. This is usually a series of vertical lines within a rectangular frame. At the very bottom of his chest area, draw a thick, solid bar for his truck bumper. This really gives him that strong, grounded appearance.
Step 4: Arm and Leg Enhancements
Shoulder Pads: Add more defined, somewhat rounded or angular shoulder pads over the shoulder blocks you drew earlier. These often have small details or vents.
Arm Panels: On his upper arms and forearms, you can add some lines to suggest armor plating. Think of how a truck’s panels fit together. Some versions, like the Studio Series figures, have very distinct panel lines, so you can try to replicate that if you like.
Hands and Fingers: Refine the hand blocks. Draw simple, blocky fingers. He usually has four fingers and a thumb. Don't worry about making them too realistic; just clear, separate shapes will work. His fists are quite powerful, so keep them chunky.
Leg Details: On his thighs and lower legs, add lines and shapes to suggest knee pads, shin guards, and other mechanical elements. Remember, some Optimus Prime designs, like the G1, have wheels on the legs, while others have a cleaner look. You can choose to add simplified wheel shapes or just keep the legs smooth, depending on the version you like best. Perhaps you could add a subtle line to suggest a tire, but keep it easy.
Feet: Make the feet look more like sturdy boots, perhaps with a few lines to suggest different plates or sections. They are quite flat and wide, usually.
Step 5: Cleaning Up and Outlining
Erase Guidelines: Gently erase all the initial light sketch lines and overlapping construction shapes. You should be left with a clearer outline of Optimus Prime.
Darken Lines: Go over your final lines with a darker pencil or a fine-tip pen to make them stand out. This gives your drawing a very finished look, you know? This is where your drawing really pops.
Bringing Him to Life with Color
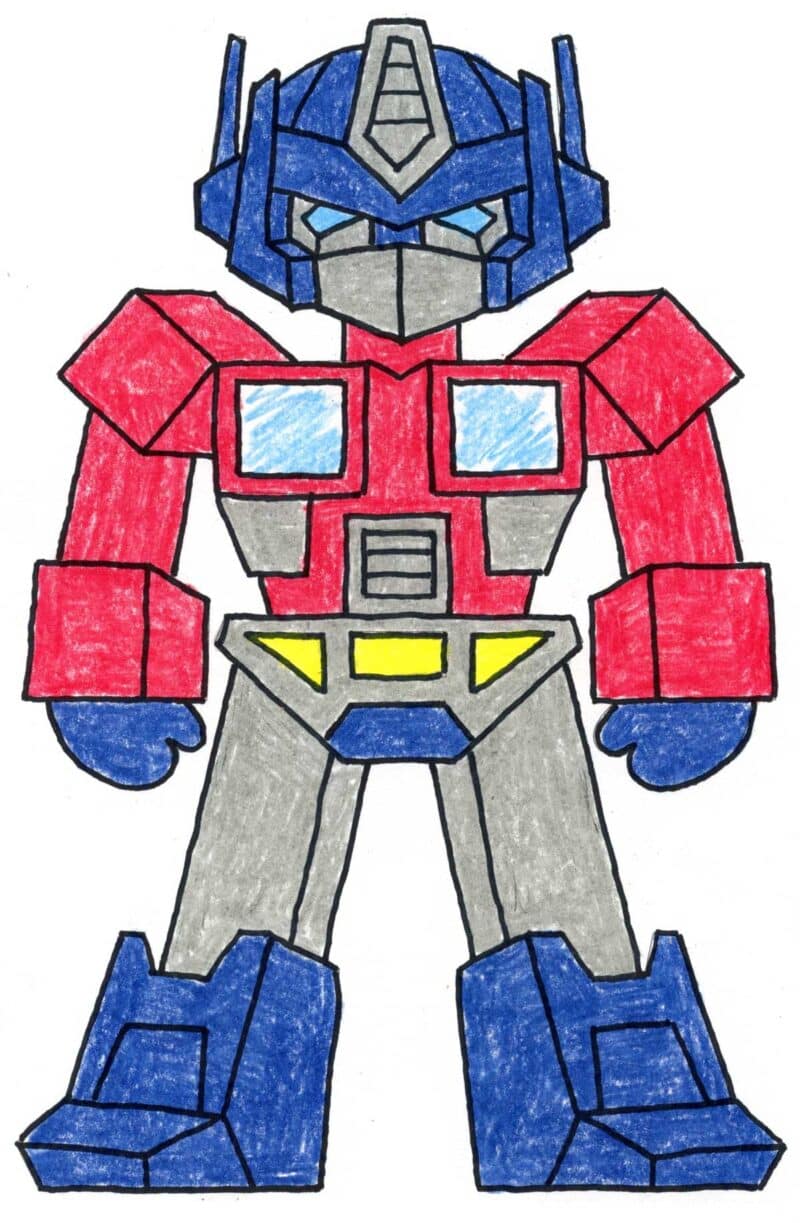
Adding color is the final step to making your Optimus Prime drawing truly vibrant. He’s known for his strong red and blue color scheme, which is quite striking. You can use colored pencils, markers, or even crayons.
Red: Color his head, chest (the windshield area can be a lighter blue or grey), upper arms, and thighs mostly red. This is his dominant color, so make it bold.
Blue: His helmet, forearms, lower legs, and feet are typically blue. This provides a great contrast to the red, and it really defines his shape.
Grey/Silver: His face mask, hands, and some mechanical parts on his joints or midsection can be grey or silver. This adds a nice metallic touch. The grille on his chest is usually silver, too.
Yellow/Orange: Small details like lights on his chest or waist might be yellow or orange. Just a little bit of this color can make a difference.
Don't be afraid to experiment with different shades of red and blue. You might use a darker blue for shadows or a lighter red for highlights. This adds a lot of depth to your drawing, you know?
Tips to Make Your Optimus Prime Drawing Even Better
Once you've got the basics down, there are always ways to improve and make your drawings even more impressive. Remember, practice is key, and every drawing you do helps you get better, basically.
Use Reference Images: Always keep a picture of Optimus Prime nearby. Look at how his parts connect, how light hits him, and what his overall posture is like. You can look at pictures of the various toy lines, like the Studio Series 86 figures or even the Walmart exclusive 40th-anniversary G1 version, to see different angles and details. This really helps you capture his essence.
Draw Lightly First: When you start, use very light pencil strokes. This way, if you make a mistake or want to adjust something, it’s super easy to erase without leaving marks. You can always press harder later to darken your final lines.
Don't Be Afraid to Simplify: For an "easy" drawing, you don't need to capture every single bolt and panel line. Focus on the most recognizable features. As you get more comfortable, you can gradually add more detail. Sometimes, a cleaner look, like the kind that might not have wheels on the legs, can be very effective and simpler to draw.
Experiment with Poses: Once you're comfortable drawing him standing, try drawing Optimus Prime in different poses. Maybe he’s mid-action, or perhaps striking a heroic stance. This adds a lot of life to your art. Think about how the Optimus Gen 2 robots show increased movement; you can try to capture that feeling.
Add a Background: A simple background can make your Optimus Prime drawing pop. It could be a city skyline, a battle scene, or just a simple color wash. This gives your hero a setting.
Learn from Others: Look at how other artists draw Optimus Prime. There are many tutorials and fan art pieces online. You might pick up new techniques or ideas that you hadn't thought of. You can find discussions on forums about different Optimus Prime upgrade kits or alternate builds, which can give you ideas for unique touches.
Keep Practicing: The more you draw, the better you'll become. Don't get discouraged if your first few attempts aren't perfect. Every line you draw is a step forward. Even the most skilled artists started somewhere, you know?
Common Questions About Drawing Optimus Prime
People often have similar questions when they start drawing a character like Optimus Prime. Here are a few common ones:
Is it hard to draw Optimus Prime?
Actually, it might seem a bit challenging at first because of all his mechanical details, but it's really not that hard once you break him down into simple shapes. By starting with basic rectangles and squares, you build him up piece by piece. It's like putting together a puzzle, in a way, just one step at a time, so it becomes quite manageable.
What are the most important parts to get right for Optimus Prime?
For Optimus Prime, the most important things to capture are his iconic head (with the helmet and face mask), his chest (which looks like a truck's windshields and grille), and his strong, blocky proportions. If you get these elements right, he'll be instantly recognizable, even if other details are simplified. These are really his signature features, you know?
How can I make my Optimus Prime drawing look more robotic?
To make your drawing look more like a robot, focus on using straight lines and sharp angles for his armor plates and limbs. You can also add small details like bolts, rivets, and panel lines. Think about how different pieces of metal would fit together. Adding shadows and highlights can also give him a more metallic, three-dimensional look, which really brings out that robot feel.
Your Next Drawing Adventure
You’ve taken a great step in learning to draw Optimus Prime, and that’s pretty cool. With the tips and steps we’ve covered, you have a solid foundation to create your own heroic leader. Remember, every artist starts somewhere, and the joy is in the process, too. Don't worry about perfection; just enjoy making art.
Keep practicing, keep exploring, and most importantly, keep having fun with your art. Who knows, maybe your next drawing will be a different version of Optimus Prime, or perhaps even his rival, Megatron, with a new head and blast effects! You can find more inspiration and drawing tips when you Learn more about drawing on our site, and for more creative projects, feel free to visit this page.
Happy drawing, and roll out those pencils! It’s July 26, 2024, and it's a great day to create something awesome.

Easy Optimus Prime Drawing How To Draw The Transformers Autobot Face
How to Draw Transformers Optimus Prime: Easy Step-by-Step Lesson
Transformers Optimus Prime Drawings Easy
