Craft A Charming Popsicle Stick Bird Feeder: A Fun Project For All Ages
Detail Author:
- Name : Mr. Monroe Collins
- Username : akeem.bogisich
- Email : vboehm@gmail.com
- Birthdate : 1971-07-23
- Address : 108 Eloisa Radial North Marco, AZ 98039-5647
- Phone : +1 (864) 770-5582
- Company : Fadel, Weissnat and Orn
- Job : Stevedore
- Bio : Aut molestias temporibus voluptas in amet in maiores. Animi hic non nam aut fuga voluptatem. Sint optio qui voluptatem repellendus officia dolore architecto porro. Consequuntur quod qui laborum sit.
Socials
twitter:
- url : https://twitter.com/chelseadietrich
- username : chelseadietrich
- bio : Necessitatibus distinctio assumenda adipisci impedit explicabo. Dolores amet cupiditate voluptatem aut. Placeat accusamus omnis aut qui quod.
- followers : 1442
- following : 2721
linkedin:
- url : https://linkedin.com/in/dietrich1974
- username : dietrich1974
- bio : Consequatur quis a delectus.
- followers : 2808
- following : 1285
tiktok:
- url : https://tiktok.com/@chelsea.dietrich
- username : chelsea.dietrich
- bio : Labore eos saepe debitis vel laudantium.
- followers : 3081
- following : 431
facebook:
- url : https://facebook.com/dietrichc
- username : dietrichc
- bio : Necessitatibus veniam laudantium non vel assumenda.
- followers : 5514
- following : 553
Do you remember the sheer joy of finishing a delicious Popsicle® treat, maybe an OMG Orange or a Cheeky Cherry, and holding onto that little wooden stick? That simple stick, which once held a frozen delight, can actually become something quite wonderful. It's almost like magic, transforming a small piece of wood into a cozy spot for feathered friends.
As of October 26, 2023, more and more people are looking for fun, hands-on activities that also help the planet. Making a popsicle stick bird feeder fits that idea perfectly. It is a way to give those sticks a second chance, rather than just throwing them away after enjoying your Groovy Grape or classic Fudgsicle® pop.
This project is a sweet way to connect with nature, and it is pretty simple for most anyone to do. Whether you are a grown-up looking for a calm afternoon activity or a parent searching for a cool project with the kids, a bird feeder made from Popsicle® sticks is a great choice. You know, it's a small act that brings a lot of cheer to your garden.
Table of Contents
- Why Make a Popsicle Stick Bird Feeder?
- Getting Your Popsicle Sticks Ready
- What You Will Need: Supplies List
- Building Your Bird Feeder: A Step-by-Step Guide
- Preparing Your Work Area
- Building the Base Layer
- Creating the Walls
- Adding a Perch
- Making the Roof
- Attaching the Hanger
- Decorating Your Feeder
- Tips for a Great Bird Feeder
- Choosing the Right Bird Food
- Where to Place Your Feeder
- Keeping Your Feeder Clean
- More Fun with Popsicle Sticks
- Common Questions About Popsicle Stick Bird Feeders
- What kind of glue do you use for popsicle stick bird feeders?
- How do you make a simple bird feeder out of popsicle sticks?
- Do birds like popsicle stick feeders?
- Bringing Nature Closer
Why Make a Popsicle Stick Bird Feeder?
Making a bird feeder from Popsicle® sticks is more than just a craft; it is a thoughtful way to engage with the natural world around you. You get to see the birds up close, which is pretty cool. Plus, it is a fantastic way to teach kids about caring for wildlife and how to reuse things, too. We all love a good Popsicle®, whether it's an orange, cherry, or grape flavor, and those sticks can have a whole new life.
Think about it: every year, over 2 billion Popsicle® treats are sold. That is a lot of sticks! Instead of them going straight to the trash, you can turn them into something useful and beautiful. It is a small step towards being more mindful about what we use and what we discard. This project, in a way, shows how simple items can become something special.
This activity also offers a chance for quiet reflection or lively family time. You can work on it alone for some calm crafting, or gather everyone for a group project. It is pretty satisfying to see your creation come together, and then even more satisfying to watch birds visit it. You will find that the process itself is very rewarding, and the end result is something you can be proud of.
Getting Your Popsicle Sticks Ready
The first thing you will need for your popsicle stick bird feeder is, well, the sticks themselves! Luckily, if you are like many people, you probably have a freezer stocked with Popsicle® treats. Maybe you have enjoyed a classic orange, cherry, or grape, or perhaps a no-sugar-added Fudgsicle®. Each one leaves behind a perfect little wooden stick. You know, collecting these sticks is part of the fun.
You will need quite a few sticks for this project, probably around 50 to 100, depending on the size you want your feeder to be. So, it is a good excuse to enjoy more of those refreshing frozen treats! After you finish each pop, just make sure to rinse the stick off with water. This gets rid of any sticky residue from the sweet flavors, like the mixed berry, lime, and lemon from a Buzz Lightyear Rocket pop. Then, let them dry completely. You can lay them out on a paper towel or a clean cloth.
Having clean, dry sticks is important for the glue to stick well. If they are wet or sticky, your feeder might not hold together as strongly. So, take your time with this step; it really makes a difference for the final structure. You could even ask friends and family to save their Popsicle® sticks for you, which is a neat way to get everyone involved in the project, actually.
What You Will Need: Supplies List
Before you start building your popsicle stick bird feeder, it is a good idea to gather all your materials. Having everything ready saves time and makes the building process much smoother. Here is what you will need:
- Popsicle® Sticks: As mentioned, around 50-100 clean, dry sticks. The more, the better, just in case you want to make it bigger or have some spares.
- Strong Craft Glue: You need a glue that dries clear and holds wood well. Wood glue or a strong craft glue like Tacky Glue works very well. Make sure it is non-toxic, especially since birds will be around it.
- Scissors: For cutting string or any other small adjustments.
- String or Twine: About 12-18 inches for hanging the feeder. Choose something sturdy that can hold the weight of the feeder and the birdseed.
- Small Bowl or Cup: This will hold the birdseed inside the feeder. A small plastic container or even the bottom of a plastic bottle cut off can work.
- Paint or Markers (Optional): If you want to decorate your feeder. Non-toxic paints are best.
- Paintbrush (Optional): If you are using paint.
- Newspaper or Old Cloth: To protect your work surface from glue or paint.
Having all these items ready before you begin will help you stay focused and make the project more enjoyable. It is like preparing your ingredients before you start cooking, you know? This way, you can just flow through the steps without stopping to look for things.
Building Your Bird Feeder: A Step-by-Step Guide
Now for the fun part: putting your popsicle stick bird feeder together! This process involves several steps, but each one is pretty straightforward. Take your time, and let the glue dry properly between steps for the best results. You will see your feeder slowly take shape, which is quite satisfying.
Preparing Your Work Area
First, lay down some old newspapers or a protective cloth on your table. This will catch any glue drips or paint spills and keep your workspace clean. It is a small step, but it really helps with cleanup later. Make sure you have good lighting, too, so you can see what you are doing clearly.
Building the Base Layer
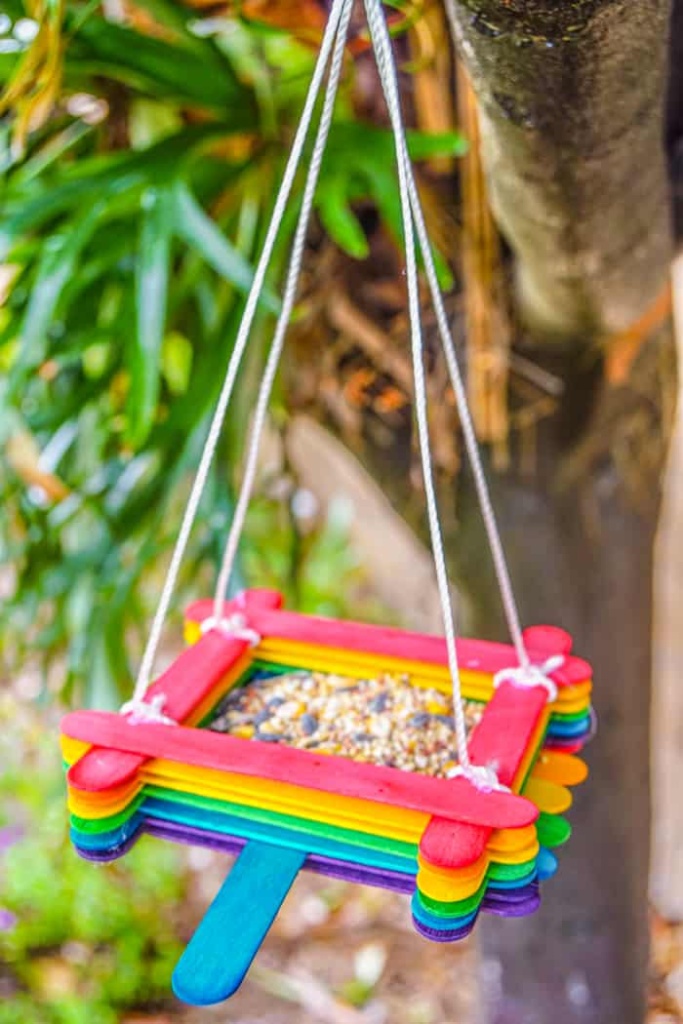
Once you have all your sticks ready, the first real step is to make the base of your feeder. This is where the birds will stand and eat, so it needs to be pretty solid. You will want to lay out two Popsicle® sticks parallel to each other, a little distance apart. These two sticks will be the starting point for your feeder's floor. Then, you will take more sticks and lay them across these first two, side by side. It's almost like building a tiny wooden raft, you know? Make sure each stick touches the one next to it, creating a flat surface. You will then apply a small line of glue to the ends of the sticks you just laid across, where they meet the two parallel sticks underneath. This helps hold everything together. This base, by the way, will be the foundation for the entire project, so taking your time here makes a big difference. You want it to be sturdy enough to hold birdseed and withstand a little bit of weather, too.
Once you have a square or rectangular base, let the glue dry completely. This might take an hour or more, depending on your glue. Patience here is key, as a strong base makes for a strong feeder. You can always work on other things while it dries, perhaps planning out your next Popsicle® flavor to enjoy, like a Spongebob Popsicle® or a Firecracker Popsicle®.
Creating the Walls
With your base dry, you can start building up the walls of your feeder. This is done by layering sticks, one on top of the other, around the edges of your base. You will place two sticks parallel to each other on opposite sides of the base, aligning them with the edges. Apply glue to the ends of these sticks where they meet the base. Then, place two more sticks on the remaining two sides, overlapping the ends of the first two sticks. This creates a square frame. You know, it is like building a tiny log cabin, in a way.
Keep repeating this layering process, alternating the direction of the sticks in each layer. Each new layer should sit on top of the previous one, with glue holding them together. Build up the walls to a height of about 5-7 layers, or until you are happy with the depth of the feeder. This creates a little container for the birdseed. Make sure your layers are straight and even, so your feeder looks neat and holds the seed well. You will find that consistency here is pretty important for the look and function of the feeder.
As you build, you might notice small gaps between the sticks. That is perfectly fine. Birds are not too picky, and a little airflow is actually good. Just make sure the main structure is solid. Let the glue dry after every few layers if you feel the walls are getting wobbly. This helps prevent your structure from falling apart before it is fully built. It is a bit of a balancing act, you see.
Adding a Perch
A perch gives birds a place to land and rest while they eat. You can add one or two perches to your feeder. To do this, simply glue a Popsicle® stick horizontally across one or two of the open sides of your feeder, near the bottom of the walls. Make sure it sticks out far enough for a bird to comfortably sit on it. You know, a small bird like a sparrow or a finch will appreciate this little landing strip. You can even use two sticks glued together side-by-side for a wider perch, if you want.
Secure the perch firmly with glue, making sure it is strong enough to hold a bird's weight. Let it dry completely before moving on. This small addition makes your feeder much more inviting for your feathered visitors. It is a thoughtful touch, really, and shows you are thinking about the birds' comfort.
Making the Roof
A roof protects the birdseed from rain and snow, keeping it dry and fresh for the birds. You can make a simple A-frame roof or a flat roof. For an A-frame, glue two sticks together at an angle to form a V-shape. Repeat this several times to create multiple V-shapes. Then, glue these V-shapes onto the top edges of your feeder walls, creating a sloped roof. You can then glue more sticks across the top of these V-shapes to complete the roof. It is a bit like building a tiny house, in some respects.
For a flat roof, simply create another square or rectangular base, just like you did for the bottom of the feeder. Make it slightly larger than the top opening of your feeder walls. Then, glue this flat piece on top of your walls. This offers good protection, too. Whichever style you choose, ensure the roof is well-attached and covers the opening effectively. This helps keep the birdseed dry, which is pretty important for the birds' health.
Let the roof dry thoroughly before proceeding. A wobbly roof will not do much good in a sudden downpour. You want it to be secure, just like your home's roof. This step, you know, really finishes the look of your feeder.
Attaching the Hanger
Once your feeder is fully assembled and the glue is dry, it is time to add the hanger. Cut a piece of string or twine about 12-18 inches long. Thread one end of the string through a gap in the top layers of sticks on one side of the feeder. Tie a knot to secure it. Repeat this on the opposite side of the feeder with the other end of the string. You will want to make sure the string is evenly balanced so the feeder hangs straight. You could even poke small holes with a sharp tool (with adult supervision, of course) if you need to, but often, there are enough natural gaps between the sticks.
Bring the two ends of the string together at the top and tie them in a sturdy knot, forming a loop. This loop is what you will use to hang your feeder from a tree branch or hook. Test the hanger by holding it up to make sure it feels secure and the feeder hangs level. This step is pretty important, as it determines how your feeder will be displayed. A strong knot is definitely needed here.
Decorating Your Feeder
This step is completely optional, but it adds a personal touch to your popsicle stick bird feeder. You can use non-toxic paints, markers, or even glitter to decorate your feeder. Think about colors that might blend with your garden or bright colors that stand out. You know, a little bit of color can make it really pop.
If you are painting, apply thin coats and let each coat dry before adding the next. This prevents the sticks from getting too soggy or the paint from running. You can paint patterns, add designs, or simply give it a solid color. Just remember to use non-toxic materials, as birds might peck at the feeder. This is a chance to be really creative, and it is pretty fun to see your artistic side come out.
Once decorated, let everything dry completely before putting birdseed in it or hanging it outside. You want to make sure all the paint is set. This final touch makes your feeder truly unique, and it is something you can be proud to display. It is your own little piece of art, actually.
Tips for a Great Bird Feeder
Building a popsicle stick bird feeder is a simple project, but a few tips can help make yours even better. First, always use plenty of glue. It is better to use a little too much than not enough, as this ensures your feeder stays together. Just make sure it is not so much that it oozes everywhere. You want strong bonds between the sticks, you know?
Second, allow ample drying time. This is arguably the most important tip. Rushing the drying process can lead to your feeder falling apart when you hang it up or when it gets wet. Some glues need a full 24 hours to cure completely. So, be patient; it is worth the wait. You can even place it in a spot where it gets good airflow to help it dry faster.
Third, consider adding a small, shallow dish inside the feeder for the birdseed. This makes it easier to clean and prevents the seed from getting stuck in the cracks between the sticks. A plastic lid from a yogurt container or a small, shallow plastic bowl works well. This also helps protect the wood from moisture over time, which is pretty helpful for the feeder's life. It is a simple addition, but it makes a big difference for maintenance.
Finally, if you plan to keep your feeder outside long-term, you might want to apply a non-toxic, weather-resistant sealant to the finished feeder. This will help protect the wood from rain and sun, making it last longer. Just make sure the sealant is safe for birds. This extra step is pretty good for durability, especially if you live in an area with a lot of rain. You want your feeder to last, right?
Choosing the Right Bird Food
Once your popsicle stick bird feeder is ready, you will need some bird food to attract your feathered visitors. Not all bird seeds are the same, and different birds like different types of food. Black oil sunflower seeds are a very popular choice. They have a thin shell, making them easy for most birds to open, and they are high in fat, which birds need for energy. You know, these are basically a universal favorite.
Other good options include nyjer (thistle) seeds, which are loved by finches, and white proso millet, which ground-feeding birds like sparrows and doves enjoy. A general "wild bird mix" is also a good starting point, but check the ingredients. Some mixes contain a lot of filler seeds that birds do not eat, which just creates waste. You want to pick a mix that has seeds birds actually like. It is pretty important to give them good food.
Avoid feeding birds bread, crackers, or other human foods, as these offer little nutritional value and can even be harmful. Also, make sure your birdseed is fresh and free of mold. Moldy seed can make birds sick. Storing your birdseed in a cool, dry place helps keep it fresh. You will find that fresh, high-quality seed attracts more birds and keeps them healthy, which is the whole point, really.
Where to Place Your Feeder
The location of your popsicle stick bird feeder matters a lot for attracting birds and keeping them safe. Hang your feeder in a spot where it is visible to you, so you can enjoy watching the birds, but also safe for them. A good spot is typically near a tree or shrub, but not so close that squirrels or other predators can easily jump onto it. You want to give the birds a quick escape route if they feel threatened. It is about balance, you know?
Place the feeder about 5-10 feet away from dense cover. This provides shelter for the birds if a hawk flies by, but it is far enough away to deter ground predators. Avoid hanging it too close to windows, as birds can accidentally fly
Popsicle Stick Bird Feeder Craft - Made with HAPPY

Popsicle Stick Bird Feeder - Happy Toddler Playtime

Popsicle stick bird feeder craft – Artofit
